Saturday, December 31, 2011
Tuesday, December 27, 2011
mini led video
There's a SPCL'79/Barnstorm Cycles ChopCult Metal Shop feature here on making a mini led tail/brake light right now. The video here shows a majority of the steps involved, as the video included in the feature just touches on a couple of the steps. Props go out to Gabe Kajimura @ After Hours Choppers for the construction ideas and inspiration.
Sunday, December 25, 2011
My wife rules
Merry Christmas to all!
Thursday, December 22, 2011
Roland Gaucher's Bentley BR2
Roland recently came into the shop to share his hand machined scale model of a functioning Bentley BR2 rotary airplane engine. The work on this beautiful piece of machinery is absolutely staggering. It took him 2 years/1500 hours to produce the complete engine and the only thing he didn't make was a few of the nuts used. He even made the spark plugs! Talent like this always inspires me.
Tuesday, December 13, 2011
Clint on a knuckle
Narrow buckhorns
Monday, December 12, 2011
Back to it
Sunday, December 11, 2011
Wednesday, December 7, 2011
Tuesday, December 6, 2011
Where it will go in
Hammerform part 4: the back side
Something I haven't talked about is annealing the aluminum before you try to form it, so here goes.
-use a dirty acetylene only flame to put a layer of soot on the surface
-change the oxy-acet flame to a neutral flame and heat the entire piece until you make the soot disappear and reveal nice clean alum
-let the alum air cool, and it's annealed
I decided to hammer the back panel of the oilbag, so it's back to the buck.
Fitted
Welded
Top mounts
-use a dirty acetylene only flame to put a layer of soot on the surface
-change the oxy-acet flame to a neutral flame and heat the entire piece until you make the soot disappear and reveal nice clean alum
-let the alum air cool, and it's annealed
I decided to hammer the back panel of the oilbag, so it's back to the buck.
Fitted
Welded
Top mounts
Sunday, December 4, 2011
Hammerform part 3: oilbag side/top
Starting to bend the annealed sides to the form.
I drill some holes in the sides of the oilbag, screws/washers help hold them to the form while tacking together.
Grind a bit of the hammerform away so as not to dirty the weld tack areas with charred mdf.
Mark the tacking areas with the sharpie.
Fully welded.
Cleaned up.
Another mocking.
Acme springer
Thursday, December 1, 2011
Hammerform part 2: operation ironhead oilbag
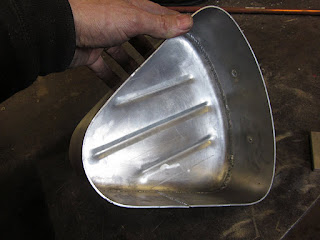
Roll a few beads on what's to be the top of the oilbag.
Top support to hold the aluminum to the hammerform without marking it.
Line up and make an mdf and alum sandwich.
Start hammering. Go slow and even as you make your way around, taking extra care at the corners. Use a plastic faced mallet (or some other non-marring hammer) to keep from marring the surface of the alum too much.
Finished top piece.
Next I'll be tackling the sides.
Subscribe to:
Posts (Atom)